Monday, December 24, 2018

Have a Merry Christmas and a Happy New Year

Well another year has gone by and this now makes the tenth year of the blog, quite amazing!

I don't know what I expected when I started the blog in 2008 but I have had fun although the posts have got a bit further apart of late. I will try to do more posts about the layout and little projects this coming year although there will be the odd 3D printing post as I find it a fascinating way to model although not suitable for everything.

I have always liked to push the boundaries and try new techniques and as such BYLONG has really been a test bed down the years since it first started in 1978. Parts of the existing layout are still in evidence from the first exhibited 1979 version and it takes me back to an earlier time when I look at this years Christmas card as the hill behind the town with the rusty corrugated iron shed above the street is from the original layout.


Talking of projects I really must finish the pub on the corner of the main street, slack! Unfortunately this is a side effect of having ideas and wanting to try new things.

It doesn't look like the lack of a two story verandah and awning has caused the locals to stay away on this Christmas Eve afternoon.

Merry Christmas and Happy New Year!

Tuesday, December 11, 2018

Lambing Flat Running Session

Last Friday night I attended a running night at James McInerney's Lambing Flat layout along with James of course, Ron Cunningham, Terry Flynn, Marcus Ammann and John Zubrickas. James will be moving in the New Year and the layout won't be in its current configuration at its new home so it was a night to run it before it goes into a temporary limbo.

I tried out a small 4K video camera that has been designed to be used on a drone. The idea being that as most of these cameras have a wide angle lens which can give some distortion in the outer areas of the picture the 4K resolution will allow a Full High Definition(or near enough) segment of the images to be cropped to remove the distortion and also possibly room walls, etc. The camera doesn't have a screen so I had to place it where I thought it would give a good view of the action. Sometimes I placed it a little too close so the trains might be a bit out of focus but the low down by the track effect is good I believe.

The operating was fun particularly the shunting which I didn't video unfortunately. James has his shunting locomotives set up with momentum and he requests that you shunt by accelerating to step 20 of 128 on a DCC throttle so that the movement is very smooth. As the shunting locomotives have Soundtraxx Tsunamis (original Tusnami, Econamis and a Tsunami 2) then a working brake is also available and this can be used to great effect to slow down and neatly couple to a wagon, great fun!

Here is a video I put together of some of the trains running that night, enjoy.


And here are a some photos as they progress around the layout.


After adding the above photos to this post I realised that I missed a creek section between the station yard and the stock race as well as the branch leading to another staging yard, it can be seen leaving to the right in the second photo immediately above.

I hope you enjoyed the video and photos as I certainly enjoyed the night, thanks James!


Tuesday, November 27, 2018

Shapeways 15% Off Sale Extended for 24 Hours

Shapeways has extended the 15% off sale for another 24 hours.
Thank you those who ordered something from my Signals Branch shop.
Use the code HAPPYMONDAY

Friday, November 23, 2018

Shapeways is Finally Having a Sale

Shapeways has just announced a 15% off sale that will be on what the USA calls Cyber Monday, 26 November 2018.

This is a 24 hour one day sale and the timing is the USA 26 November not Australia's so if you wish to place an order then make sure it is 26 November in New York.

Here is a link to a web site that can give you the time in New York:

This web site has a clock for Sydney and another for New York both with their respective dates below them.

This is the first sale since about January as Shapeways has been 'tightening their belt'.


Thursday, November 15, 2018

UPDATE - SIGNALS BRANCH and Shapeways New Pricing

Shapeways adjusted its printing costs on 22 October and anything new that I upload will be at the increased price and any existing items on my shop will remain at the old price until January 2019 when those prices will increase.

So if anyone wants to order something they had best do it before January.

It is hard to determine the new pricing as Shapeways no longer publishes their pricing algorithms (the way they calculate the price) for each material. The only way I can do so is to upload all 295 or so models on my shop as pricing ‘dummy’ checks.

I have done some ‘dummy’ uploads of existing items to see what the new prices will be.

The Smooth Detail Plastic (previously Frosted Ultra Detail) has gone up the most at about 34% of the print cost.


Versatile Plastic (previously White Strong and Flexible) has gone up a small amount, maybe 5% of print cost but a small item went up much more as a percentage so I think Shapeways has increased the base production cost and this is reflected in the large percentage increase. That is, most of the original price was base production cost.

On the few items I have uploaded the Brass seems to have gone up by 10 – 17% of the print cost.

There doesn't appear to be a simple pricing algorithm that I can work out.

Previously, the pricing went something like this:

  • A base amount to cover the production handling
  • A material used cost
  • A machine build volume component
  • The Smooth Detail Plastic (previously Frosted Ultra Detail) also had a wax support material used component.

Don't get too concerned over the percentages as there seems to be some other factors at play and the percentage may be on something that isn't too expensive, although 3D printing is expensive.

Not much fun for the modeller or the shop keeper and I have little control over the prices other than reducing what little I make.

Totally confused, I will have to wait until Shapeways gives the shop owners/designers a shop price list or some easy way to determine the new prices on mass.

Regarding the shipping, Shapeways has stated that normal production will take longer perhaps a couple of weeks longer but that there is a priority option that costs US$4.37 so about AU$6.00.

Incidentally. there has been no discounts or free shipping since about the start of the year and Black Friday (23 November - normally a Sale time) is 8 days away so it will be interesting to see if Shapeways does their usual sale. Somehow I doubt it will happen.

Wednesday, October 17, 2018

Shapeways Pricing and Shipping Changes

I have just received an email from Shapeways regarding changes to their pricing and shipping times. The details will be announced on 22 October.

Click on this link to read the letter.

Shapeways got a new CEO about six months ago and since then a number of materials have been dropped from their printing line. Also there hasn't been any discounts or free shipping for most of the year. Shapeways has been losing money in several ways and all this is an attempt to get the company working properly.

The GST addition in July impacted to pricing as well as I have previously posted.

Prices for existing items on Shapeways shops will remain the same until 2019 when they will be adjusted to the new pricing structure whatever that may be, I doubt that it will be down.

Default shipping times will be longer (looks like about 10 days longer than currently) but there will be a fast shipping option, no doubt at an increased price.

We will have to see where this goes.

Thursday, September 27, 2018

Bogie Mounts for Lima 72'6" Cars to Suit Eureka Models 3AF Bogie

I had an idea a week ago so obtained a pair of Eureka Models 3AF Bogies. These are available from Eureka Models and they are the 6 wheel bogies from the Eureka Models 72'6" passenger car range.

I thought that these would be much better under the Lima 72'6" carriages as the Lima cars do not track too well due to the lack of vertical play in the centre axle. I have for years run these bogies without the centre axle to try to overcome this issue. As a case in point I was running a pair of the Lima cars and the same bogie on the same car came off in a number of places on the layout where others don't derail. I feel that the bogie may be a bit warped or that the wheels were hitting the Kadee coupler box..

So after several designs and 3D prints on my filament printer to get the dimensions right I had working bogie centres mounted on the offending carriage.

After this I realised that I could do much the same and design a Kadee coupler mount for the ends on the carriage.

The coupler mount took 6 designs mainly working out the correct height for the coupler.

Here are a few photos to show the process of modifying the Lima bogie mount and installing the new bogie mount and the coupler mount.

Please note that the Eureka Models 3AF bogie has the mounting hole offset towards the front of the bogie, this is to reduce the possibility of the wheels hitting the Kade coupler box. As anyone knows who has done this with the Lima bogie it certainly restricts the swing of the bogie. The Eureka bogie improves this issue greatly.

The small raised walls of the existing Lima car bogie mounts need to be removed down to the large smooth surface (see photo). This is easily achieved with a pair of transistor nippers which are like side cutters but they a flat on one side of the jaws. After removing as much of the short walls as possible then use a hand motor tool or file to smooth off the remaining pad. Only the front portion of the pad needs to be nice and smooth as the new mounting will sit partially on this.

There two small die ejection pin marks that are in the corners of the carriage at the rear of the buffer beam, these need to be smoothed down to the rest of the surface so that the new coupler mount will sit flush.

Holes should be drilled with a 1/16 inch drill bit to start then finished with a 5/64 inch drill bit or a 2 mm drill bit.

The bogies and the Kadee couplers can be screwed in place with #2 self tapping screws, 1/2 inch (12 mm) long for the bogie and 3/8 inch (10 mm) for the coupler work well. The 3/8 inch (10 mm) screw is just a bit short for the bogie mounting.

The bottom edge of the carriage buffer beam needs to be filed a little to allow the Kadee coupler to sit at the right height. This is achieved by holding the 3D printed coupler mount in place behind the buffer beam and filing the buffer beam down to the level of the coupler mounting pad. A sharp hobby knife could also be used to shave away the 0.5 mm or so of plastic.

Both mountings can be glued in place with ACC Super Glue if you wish but I have found that it isn't really necessary as the screw will hold them in place securely.

Original Lima 72'6" Carriage
Lima Bogie Mount - The small walls on the mount top must go
Trimmed and smoothed Lima bogie mount
3D printed bogie and Kadee coupler mounts in place
Eureka Models 3AF bogie and Kadee 5 coupler screwed in place
Eureka Models 3AF bogie and Kadee 146 long coupler screwed in place
Finshed
The mounts can be found on my Signals Branch Shapeways shop here:

Single set of both mounts for one carriage.

Double set of mounts for two carriages.

The mounts come in White Versatile Plastic (previously known as White Strong and Flexible - WSF), Black Versatile Plastic and Smooth Fine Detail Plastic (previously Frosted Ultra Detail - FUD).

Is you use the Smooth Fine Detail Plastic then be very careful when screwing in the bogie mounting screws as the hole in the top of the mount has a very thin wall. This wall can't be any thicker as the hole in the bogie would not fit on it.

I will be at the AMRA Exhibition this coming Sunday 30-9-2018 on Keiran Ryan's Modelling Clinic stand so drop by and say hello.

Wednesday, September 12, 2018

Aberdeen Station Building Fitted with Small Signs

I installed three small station signs on the Aberdeen Station building that was the subject of a recent post. The signs are mounted with a 1 mm peg on the rear of the sign. I used a 1.1 mm drill bit after using a scriber to make a small drill centre indent in the plastic brick cladding as a 1 mm hole was too tight.

These signs were white with black as a background to the white lettering. I achieved this by using black paint over the white then carefully scraping away any black paint that got onto the face of the lettering.


The signs are WAITING ROOM, STATION MASTER and PARCEL OFFICE.

I am very happy with the signs and really must get back to the Werris creek Station building. My next mission is to do something about the brick platform edges, I could use the Slaters brick sheet but that would mean a visible join every so often, not easy to disguise.

I have had a thought about photo-shopping some of the brick platform edge that appears in some photos of Werris Creek Station that I have but due to shadows, etc it might not be too good. More thinking required, I am good at that! Don't we all do it when there is something that we are stuck on and don't know how to make a start?

Thursday, August 9, 2018

NSWGR Small Station Signs and Shapeways Changes

I have just uploaded two sets of small wall mounted station signs for NSWGR station buildings to my Shapeways Signals Branch shop.

These signs are based on actual measurements that were taken from signs on Junee station building and used to scale other size signs based on the size of the bracket used and other aspects such as the spacing of the wording used on the signs, height of the sign, etc.

Firstly there is a basic set of signs for a small station.


Secondly there is a large set of all the sign variations I could find on a search of photographs in books and elsewhere.


The brackets on the signs are the most common type I could see in the photographs. While I saw a couple of other types I suspect that they might be repairs.

There is also a very early fancy style of sign and bracket that I haven't done.

The signs have a 1 mm peg that is designed to be inserted into a 1 mm hole drilled in the wall of the station building.

Painting instructions are on the shop in the product description for the signs.


Shapeways Changes

A word of caution here, Shapeways is currently changing the look and operation of their web site. Luckily the shop doesn't seem to have changed so far but for us designers they have been moving a lot of things around, very useful, NOT!

Shapeways has a new Chief Executive Officer and I think a new board, so this will be him showing that he is doing something.

Another thing I have noticed is the lack of any discounts or free shipping offers, I don't know if these types of offers will continue or not but several materials have been removed from their 3D printing range so I suspect that there is some belt tightening going on.

Also you will see that most items on the shop now have very odd pricing, this was always the case if you viewed the shop showing Australian Dollars due to the currency exchange rate. However, now the US Dollar prices are odd, this is due to the fact that Shapeways has included the Australian 10% GST as required by our government.

I guess we will get used to the changes.

Thursday, August 2, 2018

Model of Aberdeen Station Building

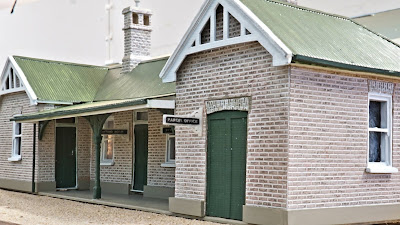
I appear to have been a bit quiet of late but not so. I have spent some time working on a HO model of Aberdeen Station building for Ron Cunningham's Werris Creek layout.

For a number of years there was the start of the Aberdeen station building sitting on the platform of the Aberdeen on the Werris Creek layout. This model consisted of the walls in Slaters brick backed with about 0.060 " plastic. As I had a plan of the building I mulled over what to do about it. One Friday night at our a meeting I removed the building from the layout and told Ron I had taken it so he wouldn't wonder where it had gone.

A month later I returned it complete and ready to place on the platform.

I had decided to draw up all the windows, doors, gable ends, awning post with cast iron brackets and chimneys; then print them on my ANYCUBIC Photon 3D DLP printer. It turned out to be a bit of a mission as I had to draw up the brick arches that are over the windows and doors. Now that wasn't too bad but the fun started when I had to cut the shaped holes for the arches into the existing walls that were about 0.080" thick!

Ron had also missed a door to the 'Out Of' part of the building in the rear wall which is not visible in the very few photos of the Aberdeen station building (but it was on the plan).

As the building had no roof as yet I decided to try something different and I printed a roof in two halves on my Cocoon Create Model Maker PLA filament printer. These roof sections really gave the building a lot of strength. I had to do the roof in two parts as my printer is only a baby and didn't have a big enough build platform for the whole roof.

Even with the 3D printed parts the model was still a challenge due to the extra detail parts that still needed to be added. what had I started!.

The corrugated roof was added using some polystyrene sheeting and all those angles for the hip roof was a lot of fun, NOT!

The bricks were done to look like 'common' bricks as that is what they seemed to be. I had to guess a bit with the brick colour and also for the roof which appeared to be a very weathered green roof. I did my usual common brick effect using Tamiya Buff, followed by a watery off white wash for the mortar and then I used a watercolour pencil of a darkish brown to give the burn marks usually seen on common bricks in NSW.

Anyway I got there in the end and presented the station to Ron two meetings later.

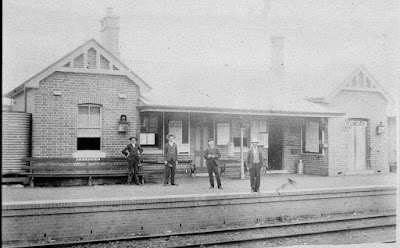
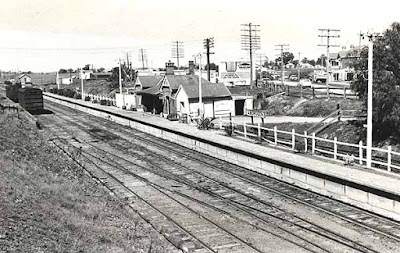
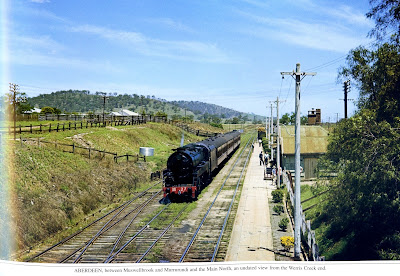
Here are the only Aberdeen station building pics I could find:

Aberdeen in its early years
Aberdeen in 1958
Aberdeen undated - Train Hobby book - Country Stations of NSW Part 5
Here is a link to the Aberdeen Station Building Plan.

And here is the model:


I will put the 3D parts on my Shapeways Signals Branch shop if there is any interest, just let me know.

Yes, I know, I still have to finish the Werris Creek station building, it is getting closer, next job is to work out how to do the brick platform edging, easy enough to say.


Sunday, June 24, 2018

Wombat Models C30T Funnel and Steam Dome Replacements

I have added replacements for the Wombat Models C30T funnel and steam dome to my Signals Branch Shapeways shop.

The funnel and steam dome have been designed from NSWGR plans and are available as replacements for the three part funnel and the steam dome of the Wombat Models HO NSWGR C30T Class steam locomotive.

The funnel has the correct 8 bolts around the flange.

The funnel and steam dome have been produced in Smooth and Smoothest Fine Detail Plastic (SFDP - acrylic). The SFDP steam dome has been made hollow to allow rolled up lead sheet to be inserted for extra weight, it should be noted that the existing dome on the model has a small piece of brass inserted in it.

The funnel and steam dome have also been done in brass after a request from a modeller.

The brass steam dome is solid for extra weight and to minimise the weight of the brass funnel the hole goes right through.

Unfortunately the Wombat Models smokebox has a weight in it which is well forward of the front driving wheels which with the lever action produced will reduce the weight on the rear driving wheels, bad design. It may be possible to remove the weight but it is almost certainly held in by the same glue as the funnel and steam dome. Perhaps there is a 'solvent' that will dissolve the glue without impacting the plastic of the smokebox (brake fluid, citrus oil, eucalyptus oil, maybe?). If attempting this, do remove the small lighting printed circuit board and test a small drop of the 'solvent' somewhere out of sight, inside the boiler perhaps.

The funnel and steam dome have been designed to fit in the same slight recesses and holes in the boiler and smokebox.

The Wombat Models funnel and steam dome have been glued in place with a slightly flexible glue that doesn't attack the plastic of the locomotive. They can be removed by pulling and working it back and forth carefully using your fingers.

Clean the glue fully from the recesses and continually trial fit to ensure that the original glue is all gone or the funnel and steam dome will not sit correctly.


Wednesday, May 23, 2018

A Bit of a Catch Up - Some Actual Modelling!

I have been a bit busy of late so here is a few things I have been working on.

Firstly I have completed the Laser Rail Bits timber trestle bridge and fitted it with my 3D printed 1 1/2 inch square nut/bolts with 3 inch square washers and the bridge came out very nice. I followed the instructions and stained the timber with a Raven Oil and methylated spirits mixture. I did find that I had to make the mixture a bit stronger than in the instructions though, possibly more dense timber. I also noticed that the line drawing of a trestle in the instructions seemed to be incorrect in regard to how the diagonal timbers would go onto the piles. I will contact Rod Kelly of Laser Rail Bits about this.

As Rod had already laser marked the square nut/bolt/washers on the timber so it was an easy task to drill a 0.6 mm hole and insert the 3D printed ones.

Laser Rail Bits timber trestle bridge with 3D printed nut/bolt/washers
Close up of nut/bolt/washers on trestle bridge
Next, I have been back working on the Werris Creek station building for Ron Cunningham. The downpipes on the North West platform side of the building had me bluffed as sometimes can happen with a model. I was put off by the complicated way that that pairs of the downpipes came down from the 'scuppers' joined together then went through a water filter, emerged from the water filter then went down through the platform awning. The water filters are Rail Central parts available from Casula Hobbies. Anyway, as can happen, once I started it only took about three hours to cut the 1 mm Evergreen plastic rod and fabricate them.


Signals Branch 3D printed 48 inch single flourescent light as on the prototype

Tamworth platform side

North West platform side showing upper floor awning against the western sun.
One aspect of the awnings is that all the nice window, door and downpipe detail is virtually hidden! Oh well.

I still have a few more things to add to the building but these will be done once the handling of the building is basically over to prevent damage. There are two flag poles coming out at a 45 degree angle from the upper floor on the Tamworth side, some double flourescent lights projecting out in several places as well as a couple of 'stink pipes' that come above the top of the building.

The next thing to do is to work on the brick platform faces, these will be made from Slaters brick sheets and it will be next to impossible to connect them without a join showing.

Items still to be done will be station signs, the signal box, small cast iron signs for Station Master, Men, Ladies, etc. and the surface of the platform.

The last thing I have done recently was to present at the Modelling the Railways of NSW 35 where I gave a talk on practical information on 3D printing. The talk seemed to go over well and I had about 60 attendees over three sessions. A good day in all.

Here is a sneaky photo taken by Zane Maber.


That's about it although I have been doing a lot of stuffing about with my two 3D printers as well.

FDM 3D printed mounting for three PMG key switches for Bylong signalling
DLP 3D printed Cheap Signal Box - Learning about support placement
Til next time then......

Wednesday, May 16, 2018

Shapeways Makes Changes to Material Names and Drops Other materials

Well, Shapeways have done it again!

They have today renamed a number of their materials, no doubt for marketing reasons or trying to make it simpler for new customers.

Anyway, for the the main materials I use on my Signals Branch shop White Strong and Flexible is now called White Versatile Plastic and Fine Ultra Detail is now called Smooth Fine Detail Plastic.

The various web pages have been modified as well and some things have moved.

Also they have dropped a number of materials from the available line, none that worry me but I am sure there will be an outcry from those who use them in their shops. 

I will have to go through the text descriptions of some of my models and change any references to the old material names.

What a pain!

Here is the announcement from Shapeways from their Forum:

We are so excited to announce the release of updates to our materials portfolio. Available, starting today are:
  • Silver: Antique Finish
    • A unique finish that gives a rugged personality to your pieces
  • Full Color Sandstone: Matte Finish
    • A smooth and matte finish for even bolder colors
  • Steel: Matte Bronzed-Steel Finish
    • A subtly rustic finish for industrial chic pieces
  • Professional Plastic (previously known as HP Nylon Plastic) is available to sell in your Shapeways shops
To make for a simpler, more user-friendly creation process, we have also updated our Materials Hub. Along with lovely new end-product photography, we have now broken our materials in to benefit driven categories which will help guide you to the right materials for your projects. The new categories are:
  • Strength & Value
  • Professional Finishes
  • Industrial Strength
  • Scale Replicas
We’ve done some renaming of our materials, more details on that can be found here in our updated Materials Naming Guide. We’ve also begun updating our Model Upload and Checkout flow to make it easier to pick your materials and finishes.

You may also notice some changes to the material offerings; as part of this refresh process, we decided to say goodbye to some of our less popular materials including:

  • High Definition Acrylate (instead try our Black HP Nylon plastic or Frosted Ultra Detail Plastic)
  • Acrylic Plastic (instead try our Frosted Ultra Detail plastic)
  • PLA (instead try our Strong & Flexible plastic)
  • Metallic Plastic (instead try our Gray HP Nylon plastic)
  • Elasto Plastic (instead try our Strong & Flexible plastic)
  • Castable Wax
  • Matte Gold Steel (instead try our Polished Gold Steel)
  • Matte Bronze Steel (instead try out Polished Bronze Steel)
  • Porcelain
If you have purchased or sold any these materials in the last 6 months, you should have been notified via e-mail. If you have any of these materials enabled in your shop, your products will no longer be offered for sale in these materials. If your product was only enabled in one of these materials, it will now be listed as public, but not for sale.

Shapeways is ever-evolving, and we will continue to focus on providing the right material solutions for your projects.

We can’t wait to see what you create with this updated experience!


Wednesday, April 25, 2018

My 3D Printing Talk at the Modelling the Railways of NSW Convention 35

As you may know already I will be giving a talk on practical information for 3D printing at the Modelling the Railways of NSW Convention 35 at Loftus on 19 May 2018.

I will be passing on the knowledge and experiences that I have gained over the last four years playing around with 3D printing. Firstly with Shapeways and more recently with the two different style 3D printers that I bought.

I hope to give those who are interested enough information to get them started in this fascinating aspect of our hobby.

Be aware though that it can be very absorbing and another hobby in itself. I have probably put hundreds and hundreds of hours into the drawing side and the printing side is certainly not the fastest thing going.

The successful setup of a 3D printer can be a bit demanding but when you get a good print it is a great feeling, particularly when you have had the idea and drawn the item up.

A recent item I printed came about when I had the idea to draw up some one and a half inch nuts/bolts with three inch square washers for the Laser Rail Bits NSWGR Timber Trestle Bridge kit I was building. Within about 2 hours I had drawn the nut/bolt/washer, copied 272 of them, attached them to a sprue arrangement,, saved the model to the STL file format and printed them on my ANYCUBIC Photon DLP printer. Now that was fun!

I have yet to install these on the trestle bridge as that other thing called real life keeps intruding.


I also did some hex nut/bolts with 3 inch round washers, just because I could.


I have added both of the nut bolt washer types to my Signals Branch Shop.

HO 1.5 inch square nut-bolt and 3 inch square washers

HO 1.5 hex inch nut-bolt and 3 inch round washers

Here are some other things I have printed on the Photon printer.

HO 3D printed cows - 3D model from the internet - Showing
some support marks I didn't clean properly
HO 3D printed water tank - Support marks not cleaned off yet

HO Werris Creek station building window - Dots are support marks on back of window